Tuesday, June 25, 2013

Heart Tie-Dye Shirt


Here are instructions on how to dye a shape into something with a simple running stitch.  I had a white exercise racer-back tank that was looking a little dingy~ perfect candidate for a color update.


Tuesday, June 4, 2013

Tasseled Scarf DIY Tutorial


Look at me!  Scarfs all over the place!  Well, this tutorial to tell you how I made the tasseled scarf pictured.  This is an easy craft that anyone could do, the most time-consuming part is making your own tassels.  If you'd like to skip that part you could buy ready made tassels, or maybe some tassel fringe by the yard from your fabric/craft store. I myself like to 1.) save money and 2.) occupy my hands while I watch trashy reality TV.  Somehow, I tell myself as I watch Joe Brown and make tassels, it's not that I'm reeeeaally watching the show, I just want "something in the background" as I work on my tassels, and hey, bonus if it teaches me a little something about law.  Right?  Here is my tutorial post on how I made my cheapie yarn tassels.  (note: the scarf has been through the wash in this pic, note how tassels are fabulously fluffed.)


Cut (or rip) the fabric on the grainlines to make a perfect 35" by 35" square, iron and finish edged however you like.  I went ahead and did a narrow hem (1/4") all the way around by folding the fabric under twice and then repressed.  I was using a lightweight rayon that I didn't think would fray nicely, but if you like the way your fabric looks frayed leave edge unfinished, or just sew a straight stitch a cm from edge to keep fray in check.  Maybe even use a twin needle for straight stitch to make it look nicer. 

Next I placed my tassels.  Now, I had already made 36 tassels ahead of time.  Feel free to add less or more to your taste.  Here is how I placed my tassels:


As you can see by the picture above, by this time my patience had run out and instead of sewing on the tassels like a good little girl, I took a shortcut- I snipped a little hole in my scarf (and I didn't even use fray-check >_<) near the edge and just double knotted them on!  I snipped the ends off the knot off course.  But, hey, you can't tell, and all's well that ends well!  

Shared at: Sew Can Do 

Monday, June 3, 2013

How to Make your own DIY Tassels

Hello!  I wanted to embellish a scarf with some tassels, but didn't want to pay too much money to do so.  Here is an easy way to make your own tassels using just yarn.  You could use whatever cord or even thread you had lying around to make tassels as well.  The size of the paper determines the size of your tassels.  Mine were 2.5" long.  I wrapped my yarn around the paper 14 times.

I had to end up washing my scarf right after I attached the yarn tassels (loong story) and they fluffed out beautifully.  I thought they were going to look terrible, but I ended up loving how it looked.  Next post will be my scarf DIY. 


Friday, May 24, 2013

Paper-Covered Boxes for the Shelf (beautiful storage!)


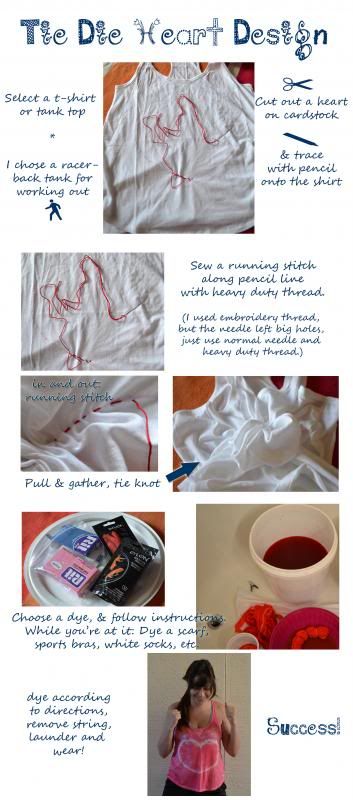
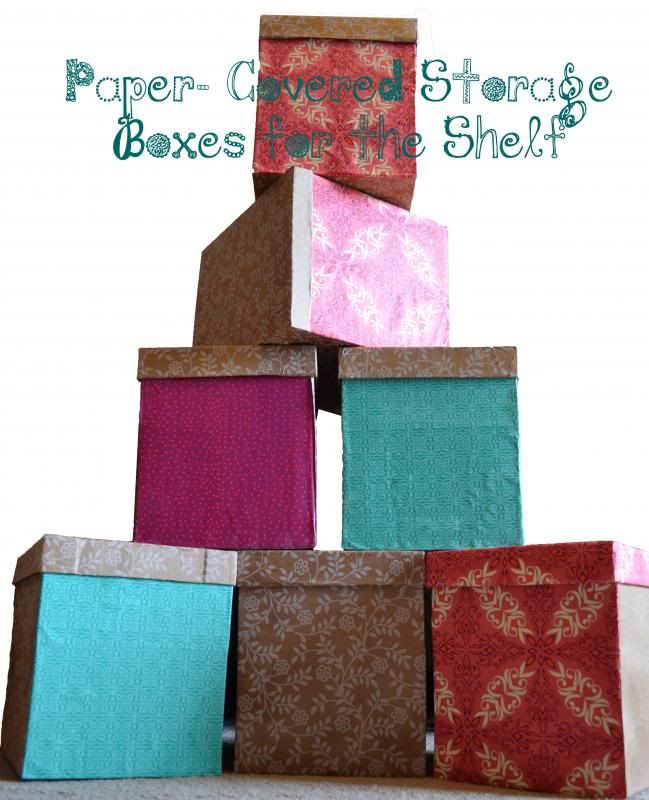
I made these boxes to fit three to a shelf, and they fit perfectly!  They are 11" deep, which is how deep my bookshelves are and I love that they don't jut out like the regular office boxes.  Making these was also much more economical that buying shelf storage boxes at $10+ each.  I just used paper I loved, Mod Podge, tacky glue, scissors, ruler and box cutter.  

Choose your size box and assemble.  I taped my box together like usual, but ended up gluing the inside flaps down with tacky glue (and weighed them down with some 2 lb hand weights).  However, careful taping the bottom together, if the tape doesn't go down smoothly (wrikles) then it will show up as a wrinkle in the paper no matter how much you try to smooth it down.  This happened to me, but I didn't worry about too much since it was on the *bottom.*  

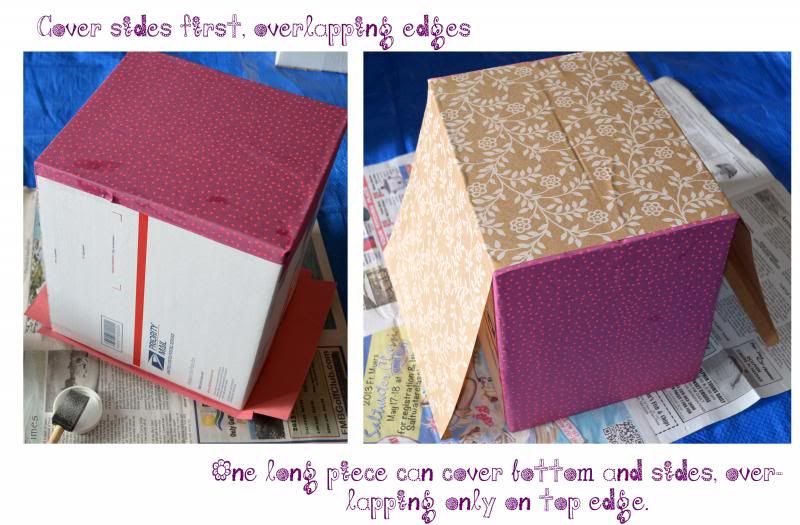
I cut out the rectangles, about 1- 1.5" extra on each side to fold over, cutting out the excess paper squares from corners.  I experimented with putting mod podge on the box first vs. on the paper first.  I liked putting on the box first best.  When you place paper, do it slowly, smoothing down a couple inches at a time to avoid air bubbles (ask me how I know!).

Then I put the long piece of paper on.  This one was cut about 1/4" less than the box on each side.  I glued down the bottom first, and then did the sides.  The paper was about 1" longer than height of box on each side to be able to fold over top to inside.  

I cut plain scrapbook cardstock to size to cover the inside of the boxes.  The front and back sides of the box I added about 1" extra to bottom and sides, I measured it so it would end about 1/2" from top edge.  I glued those first, then I glued the sides, which only had an extra 1" on bottom and were cut to have about 1/8" space on each side (if you cut it the exact length of the box it will be too long).  Then I glued the bottom, paper was exact size of bottom, no overlap needed.  

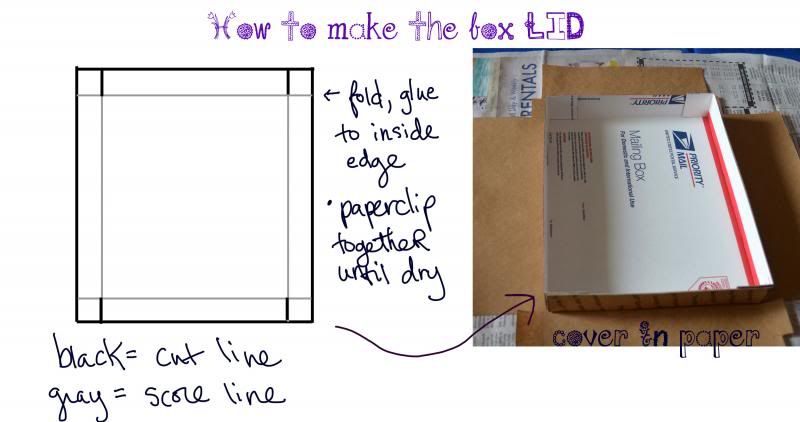
The box lid was made from a flat piece of cardboard.  Measure your box, then add about 3/8" to both the dimensions.  This makes the inside gray rectangle above.  Add 1.5" (or however wide you want the lid to be) to each side.  This makes the black rectangle.  Place your box over it to make sure the size of the box seems right, you don't want to make it too tight or too loose.  Cut out with box-cutter and ruler to keep lines straight.  Gray lines are score lines to help you fold over the sides- don't press too hard and cut through!  Carefully cut the little lines to make the flaps, fold them inside and glue them with tacky glue (or just lots of white glue).  Keep from sliding apart with jumbo paperclips while it dries.  Cover the box in coordinating paper.   


Shared at:
The Shabby Nest

Thursday, May 23, 2013

What is a Mooc? University classes for free?!

So I just signed up to World Education University online, one of the new phenomenon of these "MOOCs" that are basically free online University courses. They are even working towards being able to offer degrees, I wouldn't count on actual accreditation, but, whatever, you could still list it on your resume. I already have my BA, but am excited to be able to take an introductory course on Adobe Illustrator and an Intro. 2D Design course. If you're interested go to theweu.com, it's not a scam, they pay for it by having online advertising and making you take surveys from time to time, apparently. I haven't actually started the coursework yet since I just signed up last night, but I will update on this blog with a review when I'm done in a couple months. DIYs that I have in the pipeline: *paper-covered boxes *painted rocking chair *dip-dyed scarf

Monday, May 20, 2013

Cutoff Jean Shorts~ Ribbon Details DIY


This is the kind of DIY I love, simple and easy to do!  Just grab an old pair of jeans that still fits you, find the perfect combination of ribbon (about 24 inches of each) and get started!  My embroidered ribbon measures about 5 inches on each side, sewn.  I got a yard of each just in case, and I have plenty left over for a headband.  I ended up sewing the cuff so it wouldn't open and reveal the rough edges of my ribbons, I matched the thread to the color of the jeans so you can't tell that it's sewn unless your staring really inappropriately long at my, uh, shorts.


Shared at:
http://www.finecraftguild.com


52 Mantels

Sunday, May 19, 2013

Starting Out

I’m starting this new blog today, like I’m starting so many new things in my life.  In this blog I hope to showcase some of the projects I make.  My DIY interests run the gamut, so expect anything from furniture recovering to clothes making.  I chose the name DIY Spark because I think that doing things ourselves, even making little trifles like hair clips, sparks something great inside of us.  The pride that come from making something ourselves is a powerful, positive thing– even if said creation has wonky seams, glue marks and looks a little less than professional altogether.  Hopefully my blog will spark some ideas for anyone who reads it.
Enjoy!
Christine